¶ Initial Setup
Please note, the initial setup and or provisioning of your server can take anywhere from 5 minutes to 24hrs, as your server needs to be whitelisted by our database cluster.
Once setup and whitelisting is complete you'll be sent an email from [email protected], this will include your IP:Port information. Login to their control pannel here to get started.
Once logged in you'll see something like the below

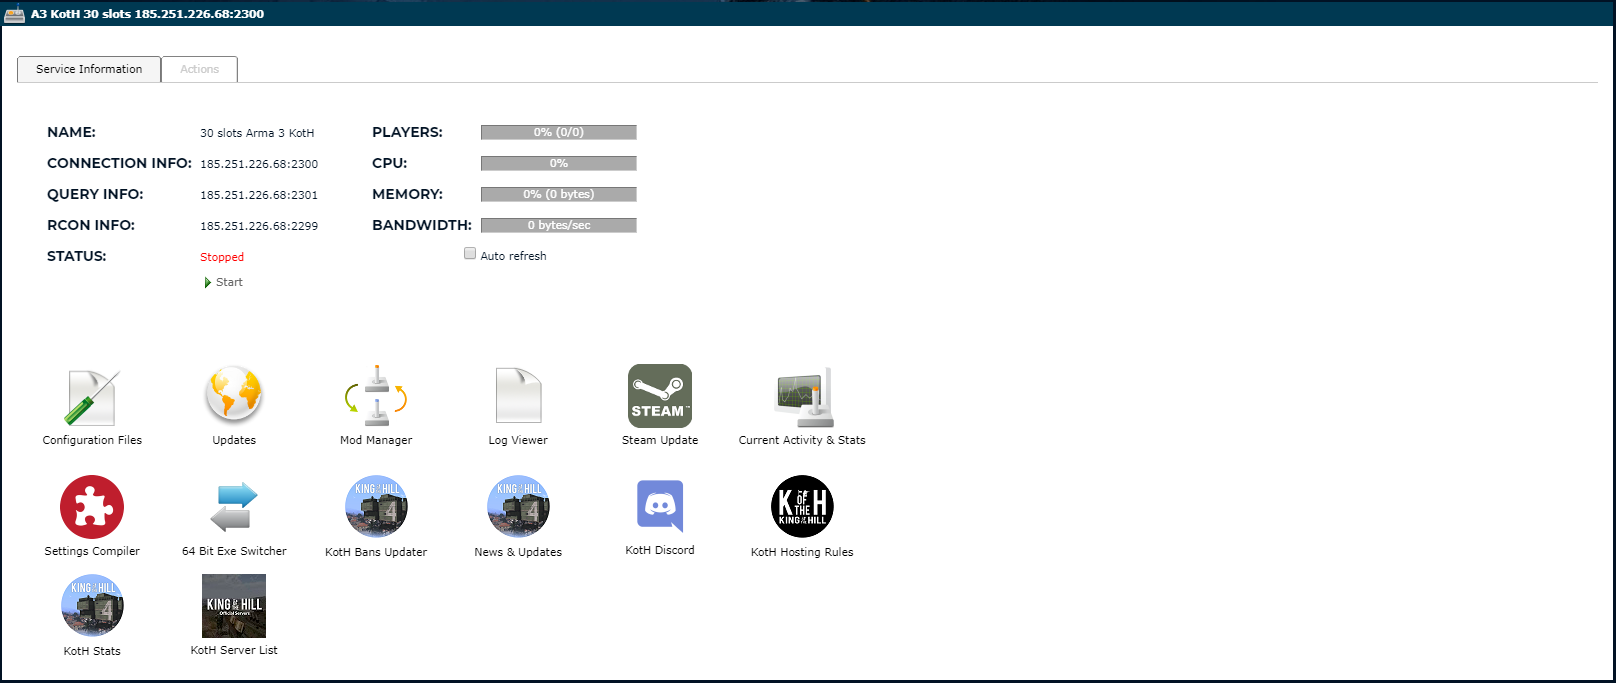
On the left select "Game Services". Once you've selected this you'll be given a basic overview of your server, this includes your servers IP:Port, Start/Stop abilities, configuration files and more. Example below.
¶ Gamemodes
As of now, only Vanilla KotH is supported. 1944, RHS and Vietnam is currently not supported.
¶ Getting Started, Server Cfg
We're now going to cover, setting your Server Name, in-game admin password and max ping.
Lets start by setting your Server Name, BattlEye Rcon Password, in-game modal messages and max ping! As in the example above you'll need to select "configuration files", once selected, find server.cfg from the avaliable list, then to the right select "[Configuration Editor]".
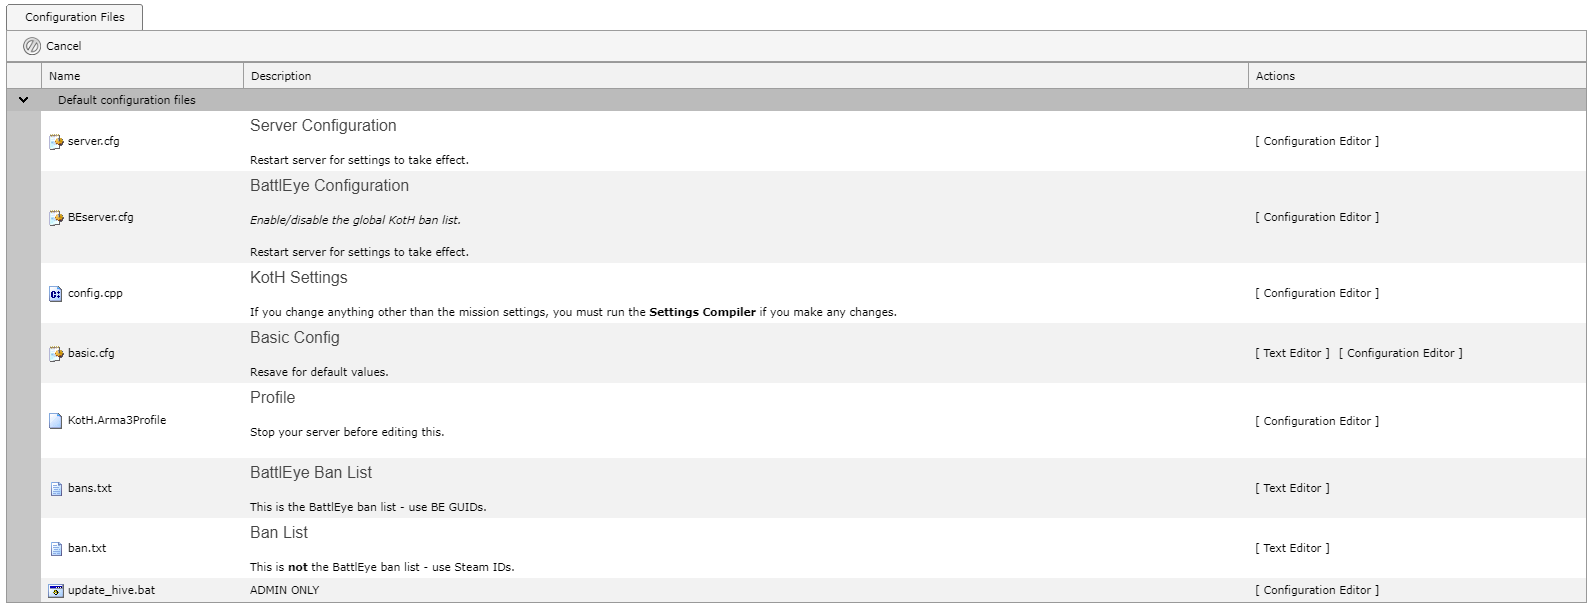
Once selected it'll open your server configutration, example below.
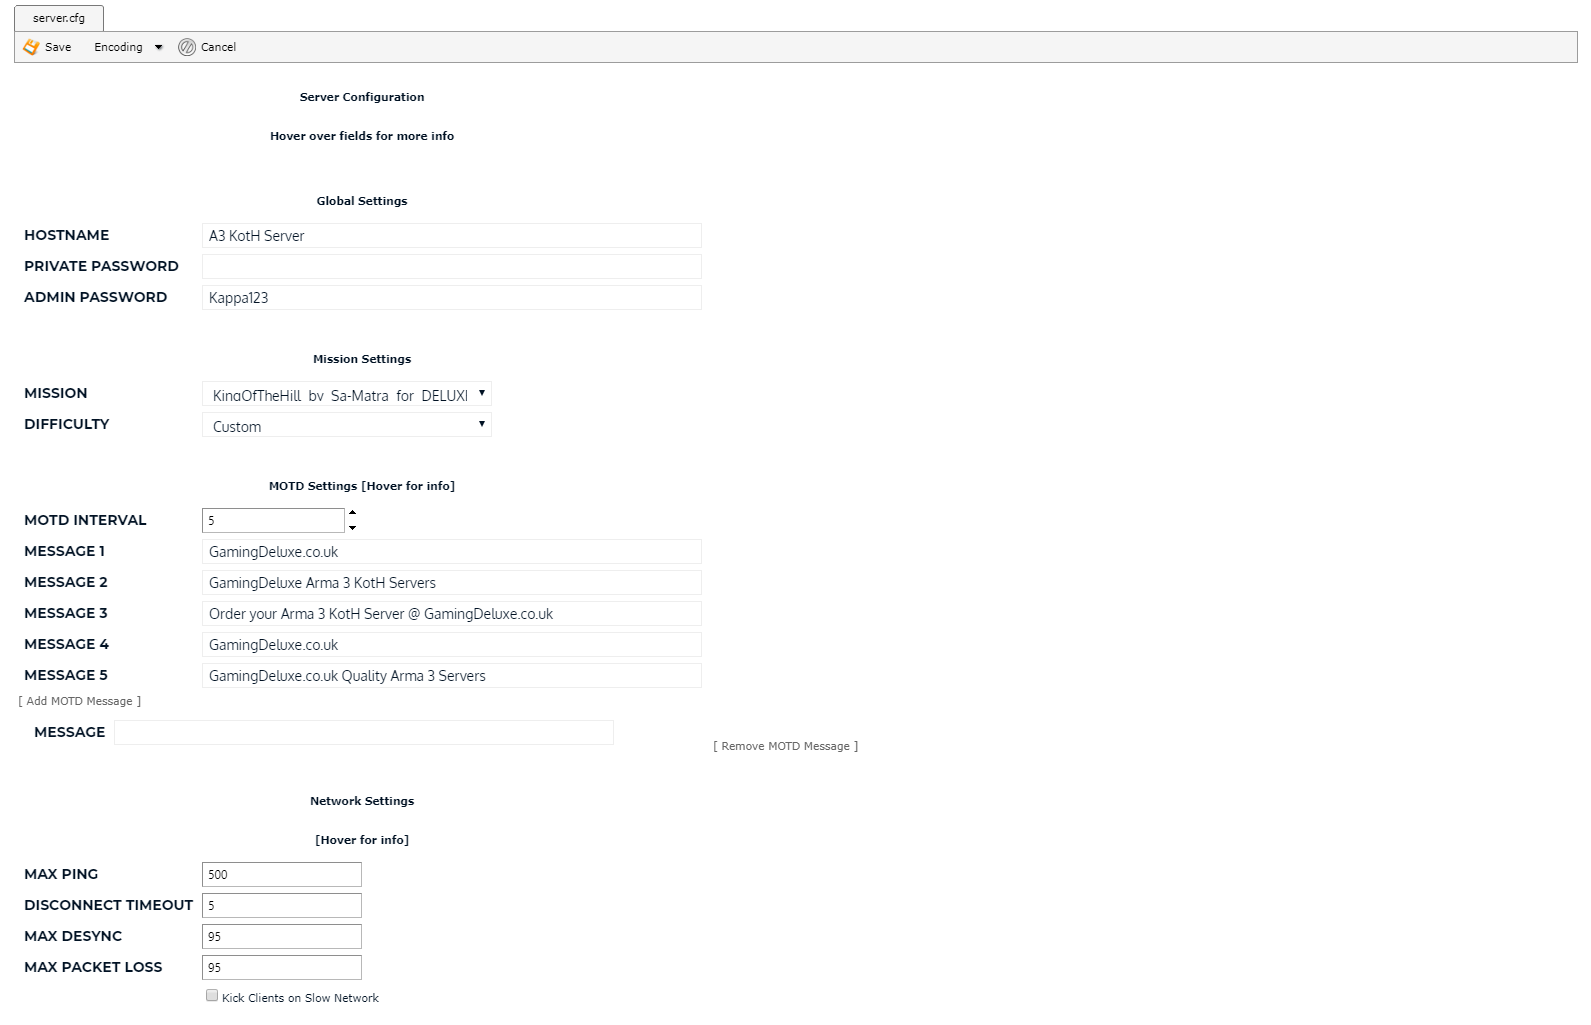
As you can probably see by the name of the fields in the above screenshot, this is where you're going to setup your server name. We're leaving ours default. However you should enter one of your own choosing within the hostname field. Please note, it cannot be too long Arma/Steam does have a character limit (63). The private password field, would prevent public from joining your server e.g. if you plan on having a clan event. NOTE: points aren't rewarded until at least 10 players.
¶ Admin Password.
This is in-game admin password, which will have to be entered when you type #login <passwordhere>. We highly recommend changing this, please don't copy the above example... This will allow you to open the spectate tool to review players within your server and use in-game admin commands such as #shutdown which will shutdown your server.
¶ Mission selection.
We recommend that you leave this default, this will allow you greater control of vehicle restrictions later on, whereas if you select the infantry version you cannot disable some specific vehicles. This is also where you can switch to Malden and Tanoa instead of Altis.
¶ MOTD Interval, and messages.
This can be set as low as one, and messages can be added as desired. This will show when you or players first connect to the server from the server browser.
¶ Max Ping.
This is the value at which the server will kick players with a too high ping, please note the disconnect timeout, max desync and max packet loss values are no longer relevant, these are hardcoded to be disabled as they're too unstable and cause excessive server side log spam causing performance issues.
¶ Disable VON and Quality Options.
Disabling VON (Voice over network), will remove in-game comms altogether, you can also configure the quality as needed and enable/disable the Opus Voice Codec. NOTE: setting the quality too high may have unexpected performance issues.
¶ BattlEye Config
From the Configuration Files window, select "BEServer.cfg".

This is where you can set your BattlEye Rcon password, we recommend keeping this something completely random. If this is compromised it can result in you and your players being kicked and banned unexpectedly.
NOTE: Our bans list is forced ON, you cannot disable this.
You can get your RCon connection IP and Port from the server start/stop screen. Specifically called "Query Info".
The best RCon tool on the market at the moment is BattleMetrics. Check them out by clicking on the below.
¶ Configuring Vehicles, Towns and other miscellaneous settings
To do this you need to go back to the configuration files, find "config.cpp", then select "Configuration Editor" agian.

Once you've selected this, you'll have access to a huge array of settings, this includes, team balance, jet purchase delays, automated shutdown options, town rotation time and selection chances, rules, perk configuration and finally vehicle and weapon configurations.
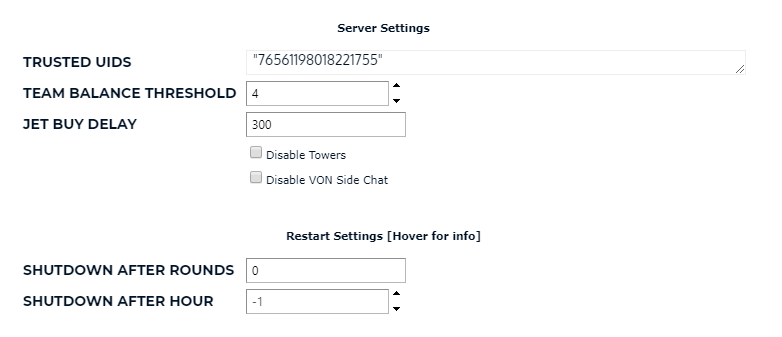
First we'll cover server administration options specifically located at the top of the config cpp configuration wizard.
¶ Trusted UIDs.
This is where you can enter you or your admins UIDs aka Steam64IDs. This will allow you and anyone else listed to access the in-game admin menu without the need to use the Admin Password mentioned in Getting Started.
¶ Team Balance Threshold.
This is where you can configure when team balance will trigger, this specifically triggers based on the highest number of players on whichever team. This also generally requires a player to die before they're team balanced.
¶ Jet Buy Delay.
This is how long it'll take jets on vehicle servers (if not disabled by an admin), to become available for purchase from round start. This setting is in seconds.
¶ Shutdown After Rounds.
This will trigger an automated shutdown of your server after a certain amount of rounds, this is defined by yourself 0 means disabled.
¶ Shutdown After Hour.
This will enable an automated restart on a specific hour based on server time, must be in a 24hr clock format e.g. 1300. This will only issue a shutdown when a round ends on the server, for example if you're halfway through a round and it hits 1300hrs it will not shutdown until round end. Preventing loss of points for players.
¶ Mission settings, specifically Town configuration!
For this part, we're not going to cover towns, but only provide one example and explanation, which you can then repeat as required for other towns.
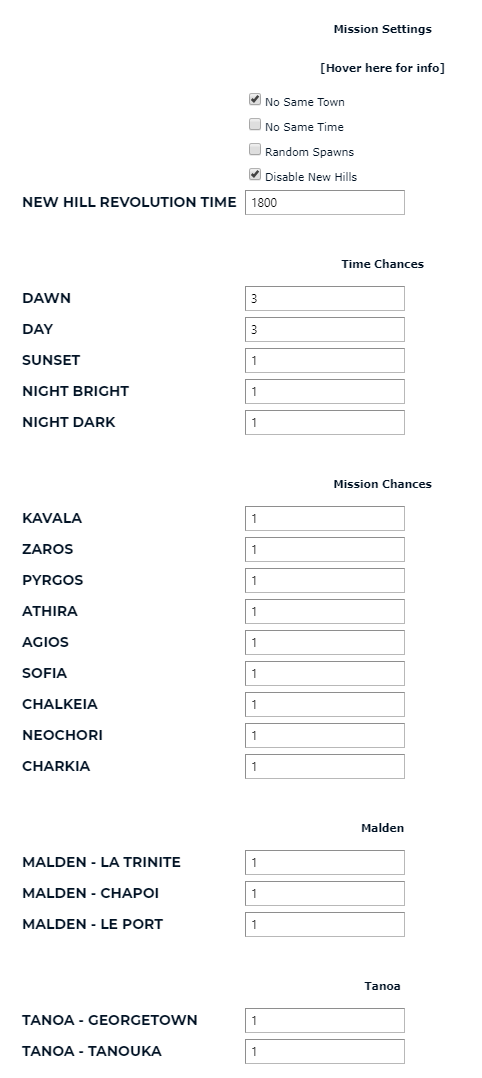
¶ No Same Town.
When selected will prevent repeats of the same town specificially if it was just played the round before.
¶ No Same Time.
This is exactly the same as the above, it will prevent duplicate times being initialised from the round prior.
¶ Random Spawns.
When enabled this will spawn each factions base in a different location on round start. Instead of it being the same everytime.
¶ Time Chances.
This is generally enabled by default, you can change this as required, -1 means disabled e.g. if you want to disable Nights. Otherwise this can be set out of 10, and it will start new towns as defined by you, e.g. if you define Day as 9 but Night as 1, there is a one in ten chance that the round will start at night time. The chances reset each round.
¶ Mission Chances.
Same as the above, except this is for town spawns and round start. -1 to disable, and each value can be set out of 10. If all values are equal (all set to 1), they should spawn in order after each respective round end. NOTE the towns defined under Malden and Tanoa, will only be active if you have that respective map selected from the server cfg as mentioned in Getting Started.
¶ Rules.
This is where you can type out your server rules for players to review on round join, or from the "map" placed in base.
¶ Links.
This is where you can define your Discord, Teamspeak or Website for example.
¶ Disable Vehicle Thermals.
Self explanatory - disables thermals on vehicles.
¶ Disable Kill Distance and Weapon Information on Revive screen.
This will disable the distance at which a player was shot from and the weapon that was used to kill them on the revive screen.
¶ Disabled Perks.
This will disable the perks selected, please note, this can have greater impact on game play, especially if you disable the launcher perk for example on a vehicle server. However, if you're planning on running an infantry server many hosts like to disable launchers.
¶ Vehicle & Weapon Availability Configuration.
We're now going to cover, how to change vehicle and weapon purchase ability or even disable them completely.
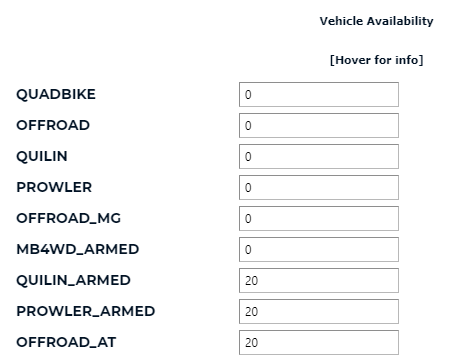
In the example below you'll see a short list of vehicles (this isn't all of them you'll have more to change on your server, we're keeping this simple). This is where you can disable vehicles, change when or change when they can be purchased.
This is slightly differnet to the mission chances section, this part of the config is based on in-game points, and specifically when certain vehicles can be purchased.
¶ Supported Vehicle & Weapon Values.
-1 = Disabled. Cannot be purchased at all at any point in the round.
0 = Available from the start of the round.
1 to 99 = When the vehicle will be made avaliable for purchase e.g. if you set it to 20 this means it can be purchased when any team hits 20 points.
Disabling Weapons, this is one of the simpler options that you can configure.
Simply select the weapons in the list (so that they're "ticked"), thats it they're disabled. Deselect them to re-enable again. Example below.

¶ Saving Your Custom Settings
Once you've configured town, vehicle and weapons to your choosing you need to "commit" the adjustments you've made. To do this go back to the server home screen (where you can press the start/stop button). Once you're there make sure your server is stopped. Then select the "settings compiler" button.
If this is successful you'll receive a notice saying "The Script has executed successfully. You may close this window." Assuming you've followed this guide from the start, you should now be ready to start your server. Have fun on the battlefield, and good luck!
